How to Rig a Bobber for Bluegill
There’s nothing quite like introducing someone, especially a child, to the pure joy of catching their first bluegill. But if you’ve ever fumbled with tangled lines, had your bait stolen without a bite, or just felt overwhelmed by all the gear, you know how quickly that excitement can turn into frustration. This guide is here to untangle those worries, offering a clear, step-by-step breakdown on how to rig a bobber for bluegill, ensuring your next outing is filled with successful casts and memorable catches.
Understanding Your Bobber Options for Bluegill
Before we even talk about tying knots, it's essential to understand the different types of bobbers out there and why one might be better than another for your bluegill fishing adventure. It’s not just about that classic red and white ball, I promise!
Fixed vs. Slip Bobbers: The Core Difference
When you're looking at bobbers, you'll generally find them falling into two main categories: fixed and slip. Each has its place, and understanding their strengths will make you a much more versatile angler.
A fixed bobber, also sometimes called a spring-clip bobber, is probably what most people picture when they think of fishing. It's the bobber that clips directly onto your fishing line in one specific spot and stays there. You can adjust it up or down the line, but once you set it, that's where it lives until you move it again. These are fantastic for shallower water, typically less than five or six feet deep. They're super easy to use, making them a go-to for beginners or when you're fishing a pond or stream where the depth isn't changing dramatically. The main advantage here is simplicity and quick setup. You clip it on, set your depth, and you're ready to go. The downside? If you're trying to fish in really deep water, say 10 or 15 feet, a fixed bobber rig means you'll have 10-15 feet of line dangling between your rod tip and the bobber, making casting practically impossible. You’d feel like you're trying to cast a lasso.
A slip bobber, on the other hand, is designed to slip freely up and down your fishing line. Instead of clipping on, your line runs through a small hole in the bobber itself. To set your depth, you use a small knot (called a bobber stop) or a piece of rubber tubing that you slide onto your line. This stop then prevents the bobber from sliding any further up the line than you want. The beauty of the slip bobber is that when you cast, the bobber slides all the way down to your hook or sinker, making for a much more compact and castable setup. Once it hits the water, your bait sinks, and the bobber rises until it hits your bobber stop, suspending your bait at the desired depth. This makes slip bobbers ideal for fishing deeper water, allowing you to easily cast a bait that's suspended far below the surface without any casting headaches. While they require a tiny bit more setup initially, the versatility they offer, especially in Indiana's varied lakes and reservoirs, is well worth it.
Why Size and Material Matter
Beyond fixed or slip, bobbers come in a bewildering array of sizes, shapes, and materials. For bluegill, generally speaking, smaller is better. Bluegill have relatively small mouths, and they can be quite finicky eaters. A huge, clunky bobber can create too much resistance when they try to pull the bait, causing them to drop it before you even register a bite. Think about it: if you were trying to eat a tiny appetizer and it was anchored to a brick, you might give up too!
So, for bluegill, aim for bobbers that are no larger than a quarter, or even smaller. These offer less resistance, allowing the bluegill to pull the bait underwater more easily, which in turn gives you a better chance to set the hook. You’ll find them made of plastic, foam, or cork. Plastic models are often hollow and bright, while foam and cork bobbers can be a bit more subtle. Many anglers prefer the natural buoyancy and sensitivity of cork or balsa wood bobbers, especially when fish are biting lightly. They tend to register those subtle nibbles much more effectively than some of the heavier plastic options.
Consider the environment too. If you're fishing in a calm, clear pond, a very small, sensitive bobber will be perfect. If there's a slight ripple on the water or a bit of wind, a slightly larger (but still small) bobber might be easier to see and less prone to false alarms from surface movement. The goal is always to use the smallest bobber that is still buoyant enough to support your bait and any necessary weight (like a split shot) and that you can comfortably see.
Step-by-Step Guide to Rigging a Fixed Bobber
This is the classic setup, perfect for introducing new anglers to the sport or for targeting bluegill in shallower areas like farm ponds or near docks. It’s straightforward, effective, and gets you fishing fast.
Gathering Your Essentials
Before you start tying anything, it’s good practice to lay out all your components. This prevents fumbling and ensures you have everything you need within reach. Think of it like a surgeon preparing for an operation, but much more fun!
Here’s your checklist:
- Fishing Rod and Reel: For bluegill, an ultralight or light action spinning rod and reel combo is ideal. Something around 5 to 6 feet long with a sensitive tip is perfect. It allows you to feel those delicate bluegill bites and makes the fight with even a small panfish feel exciting. You can find some excellent options for various skill levels if you're looking into new gear, perhaps from an online retailer like Amazon.
- Fishing Line: Stick with light monofilament line, typically 4 to 6-pound test. Anything heavier is overkill for bluegill and will be more visible to the fish, potentially spooking them. Lighter line also casts better with small baits and bobbers.
- Fixed Bobber: As discussed, a small, sensitive bobber is key. The classic red and white round bobber or a pencil-style bobber works great.
- Split Shot Weights: You'll need a few small split shot weights, usually size BB or number 7. These are tiny, round weights that you crimp onto your line to help your bait sink and to properly weight your bobber.
- Small Fishing Hooks: For bluegill, size 8 or 10 hooks are generally appropriate. These are small enough to fit in a bluegill's mouth but strong enough to hold them. You can opt for Aberdeen hooks, which have a thin wire that bends easily, making it easier to retrieve your hook if it gets snagged.
- Bait: Live bait is usually king for bluegill. Think about some "Best Bait for Bluegill Fishing in Farm Ponds" options like red worms, wax worms, pieces of nightcrawler, or even crickets. A small container of these will serve you well.
- Pliers/Forceps: Handy for crimping split shot or removing hooks from fish.
- Line Clippers/Small Scissors: For trimming excess line.
The Rigging Process
Alright, let's get down to business! Follow these steps carefully, and you'll have a perfectly rigged fixed bobber setup.
- Thread Your Line Through the Rod Guides: This might seem obvious, but start by making sure your fishing line is spooled onto your reel and then carefully threaded through all the guides on your fishing rod, from the reel up to the very tip. Leave yourself a good arm's length or two of extra line hanging from the rod tip to work with.
- Attach Your Hook: Take one of your small fishing hooks. Using a good fishing knot, like a Palomar knot or an improved clinch knot, securely tie the hook to the end of your fishing line. If you're new to knots, there are tons of great tutorials online, and it's a fundamental skill for any angler. Double-check your knot by giving it a gentle tug to ensure it holds. Trim any excess tag end of the line, leaving just a small stub.
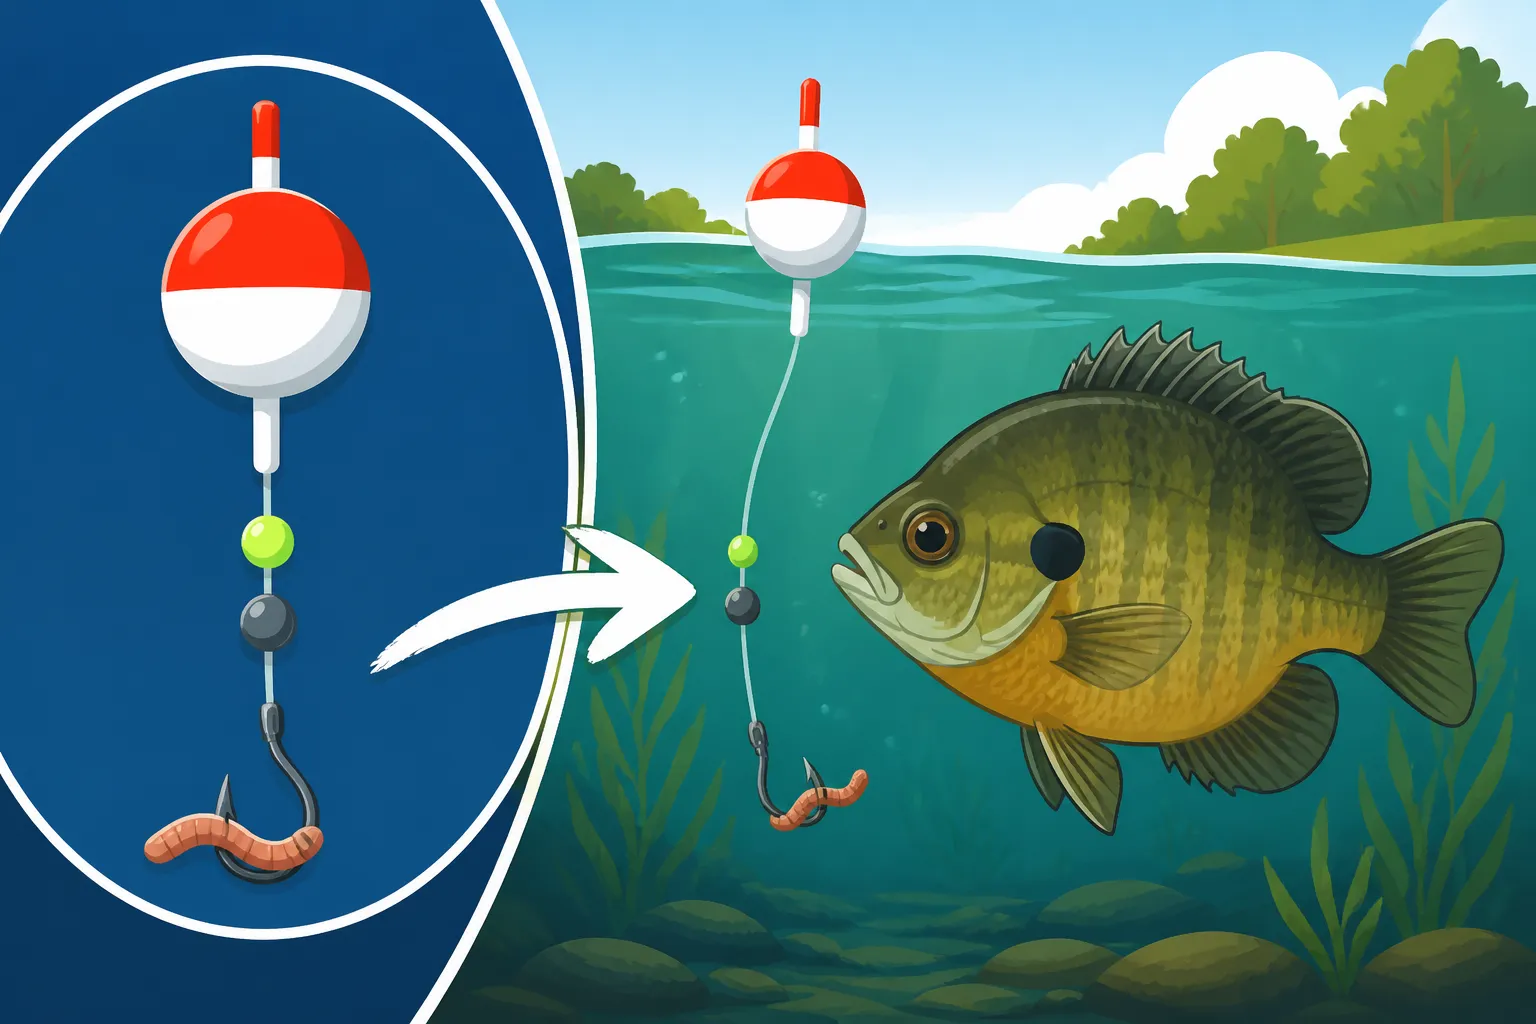
- Add Your Split Shot Weight(s): About 6 to 12 inches above your hook, gently pinch on one or two small split shot weights. The purpose of these weights is two-fold: first, they help cast your light bait a bit further, and second, they help your bait sink to the desired depth and keep it there. You want just enough weight so that your bobber sits properly in the water, not lying flat on its side, but also not completely submerged. When a bluegill bites, it needs to pull the bobber down, and too much weight will make the bobber less sensitive. A good rule of thumb is for the bobber to sit with about one-third to one-half of its body submerged, leaving the bright top clearly visible.
- Attach Your Fixed Bobber: Now, take your fixed bobber. Most fixed bobbers have a small spring-loaded clip on the bottom and a little plastic pin on the top. Press the top pin down, thread your main fishing line through the tiny loop or hook that appears, and then release the pin. Do the same with the bottom clip. Make sure the line is securely held in both ends of the bobber.
- Set Your Depth: This is where you decide how deep you want your bait to hang below the bobber. For bluegill, they're often found in relatively shallow water, especially near cover like weeds, docks, or submerged brush. Start with a depth of about 1 to 3 feet below the bobber. To adjust the depth, simply slide the bobber up or down your line. If you're fishing a new spot, you might have to experiment. You can always try fishing at a specific depth for 10-15 minutes, and if you're not getting bites, adjust by moving the bobber up or down six inches or so until you find the fish. You’d be surprised how much difference just a few inches can make in your catch rate, particularly when you're targeting panfish in areas like those you might find in "Indiana's Best Lakes for Fishing".
Mastering the Slip Bobber Rig for Deeper Waters
While the fixed bobber is great for those shallow endeavors, sometimes the bluegill are just hanging out a bit deeper, especially in bigger lakes or during warmer parts of the day when they seek cooler water. That's where the slip bobber truly shines.
When a Slip Bobber Becomes Your Best Friend
Imagine you're fishing a deep drop-off on Monroe Lake, or perhaps casting from a pier into 10 feet of water. Trying to cast a fixed bobber with 10 feet of line between it and your hook would be an exercise in futility. The sheer length of that dangling line makes it impossible to generate any real casting power or accuracy. This is the precise scenario where a slip bobber becomes indispensable.
A slip bobber allows you to present your bait at virtually any depth, from just below the surface down to many feet deep, while still being able to cast a compact, manageable rig. When your bait is in the water, the slip bobber will float up your line until it hits your pre-set bobber stop, suspending your bait exactly where you want it. This means you can cast across a wide range of depths without changing your bobber setup, simply by adjusting your bobber stop. This versatility is especially valuable on larger bodies of water where bluegill might be schooled up at different depths depending on the time of day, water temperature, or available forage. Places like Patoka Lake, with its many coves and varying depths, are prime candidates for slip bobber techniques.
Another advantage is its sensitivity. Because the line slips freely through the bobber, there's often less resistance for the fish to feel when they take the bait, which can lead to more solid hooksets. It's a game-changer for those light-biting days.
The Slip Bobber Setup: A Detailed Walkthrough
Rigging a slip bobber is slightly more involved than a fixed bobber, but once you do it a couple of times, it becomes second nature. It's truly worth the extra minute or two for the flexibility it provides.
- Add Your Bobber Stop: This is the most crucial part of a slip bobber rig. A bobber stop is a small piece of string, rubber, or plastic that you thread onto your main fishing line. These usually come pre-tied in a small plastic sleeve. You'll thread your fishing line through the sleeve, then slide the bobber stop off the sleeve and onto your main line. Cinch it down gently but firmly. This stop will determine your fishing depth. If you need more, you can buy extra bobber stops, often in multi-packs on Amazon, which is convenient.
- Slide on a Small Bead: Immediately below the bobber stop, you'll need to slide a small plastic bead onto your line. This bead is essential because the hole in most slip bobbers is too large for the bobber stop knot to catch on. The bead acts as a buffer, stopping the bobber at the exact point of your bobber stop.
- Thread Your Slip Bobber: Now, thread your fishing line through the eyelet at the bottom of your slip bobber and out through the top. Ensure it slides freely on the line.
- Add Your Split Shot Weight(s): About 6 to 12 inches above where your hook will be, crimp on one or two small split shot weights. Just like with the fixed bobber, these weights help your bait sink and help the bobber sit correctly in the water. Again, you want enough weight to make the bobber sensitive to bites, but not so much that it sinks entirely or resists fish pulling it down.
- Attach Your Hook: Finally, tie your small bluegill hook (size 8 or 10 is still perfect) to the end of your line using a strong knot like the improved clinch or Palomar knot. Trim any excess line.
- Set Your Depth (Adjusting the Bobber Stop): Now you can slide your bobber stop up or down your main line to adjust the depth at which your bait will be suspended. If you want to fish 5 feet deep, slide the bobber stop 5 feet up from your hook. When you cast, the bobber will slide down to the split shot. When it hits the water, the bait sinks, and the bobber floats up until it hits that bead and bobber stop. This setup truly changes your approach to targeting deeper fish, allowing you to access new parts of the water column.
Tips for Maximizing Your Bluegill Catch with a Bobber Rig
Having the right rig is a great start, but there are a few extra nuggets of wisdom that can truly elevate your bluegill fishing experience and fill your cooler!
Choosing the Right Depth and Bait
Bluegill are notoriously particular about where they feed, often preferring specific depths and certainly having their favorite snacks. Getting this combination right is half the battle.
When it comes to depth, bluegill love structure and cover. Think about submerged logs, weed beds, lily pads, docks, and brush piles. They hang out there for protection from predators and to ambush smaller insects and crustaceans. In shallow ponds, they might be just a foot or two under the surface, especially early in the morning or late in the evening. During the heat of the day or in deeper lakes, they often retreat to cooler, deeper water, sometimes 5-10 feet down. Don't be afraid to experiment! Start at one depth, say 2-3 feet, fish for 15 minutes. If no bites, adjust your bobber by moving it six inches deeper or shallower. Keep adjusting until you find that sweet spot where the bluegill are actively feeding. This trial-and-error approach is incredibly effective.
As for bait, bluegill are generally not picky, but some baits are definitely more productive. Live bait almost always outperforms artificial lures for bluegill, especially for beginners. My top recommendations include:
- Red Worms: These are gold for bluegill. They're small, active, and bluegill just can't resist them. A small piece threaded onto your hook is usually all you need.
- Wax Worms: Another fantastic choice, especially when fish are a bit finicky. Their white color and lively wiggles attract attention.
- Pieces of Nightcrawler: A whole nightcrawler is too big for a bluegill's mouth, but a quarter-inch piece threaded onto a small hook is perfect.
- Crickets/Grasshoppers: If you can catch them, bluegill absolutely devour these. They're particularly effective in late summer and early fall.
- Small Artificial Baits: If you prefer artificials, tiny soft plastic grubs or micro jigs (like those used for ice fishing) can work, especially when tipped with a wax worm. For more specific guidance, check out articles on "Best Bait for Sunfish and Bluegill" or even "Best Bait for Bluegill Fishing in Farm Ponds."
Reading the Bobber and Setting the Hook
This is arguably the most exciting part of bobber fishing – watching that bobber dance and then disappear! But knowing when to set the hook can take a little practice.
Bluegill bites can range from a subtle dip or quiver to a full-on yank that pulls the bobber completely under. Sometimes, they'll just nudge it, causing it to lay on its side briefly before popping back up. This is usually them mouthing the bait, and it means they're interested!
My general rule of thumb for bluegill: wait until the bobber goes completely under the water and stays there for a count of one or two. If it just dips and pops back up, they're probably just nibbling. Once it's truly gone, that fish has committed. When you see that bobber disappear, raise your rod tip sharply but smoothly to set the hook. Don't go for a violent jerk; a firm, upward sweep of the rod is usually sufficient with small hooks and light line. Too hard of a hookset can rip the hook right out of their mouth.
If you're using a very sensitive, small bobber, you might notice even more subtle indications, like a slight shimmy or a slow drift across the water. These can sometimes indicate a fish is gently pulling the bait. Pay attention to anything out of the ordinary, and if in doubt, a gentle "test" hookset (a light flick of the wrist) won't hurt.
The Importance of Light Tackle
I can't stress this enough: for bluegill, light tackle is your best friend. Many new anglers make the mistake of using gear that's too heavy, thinking "bigger is better." For bluegill, it's actually the opposite.
An ultralight spinning rod and reel not only makes the fight with a bluegill more exciting (even a small one feels like a monster!), but it also significantly increases your chances of catching them. Why?
- Sensitivity: Ultralight rods are designed with very flexible, sensitive tips. This means you'll feel those subtle nibbles that a heavier rod would completely mask. That tiny dip of the bobber becomes much more apparent when your rod tip is designed to amplify every little movement.
- Casting Small Baits: Bluegill often require tiny hooks, small bobbers, and light bait. Heavier rods simply can't cast these light presentations effectively. An ultralight rod loads up perfectly with minimal weight, allowing for accurate and effortless casting of even the smallest jigs or pieces of worm. You can find some great options that fall into the "Best Rods and Reels for Freshwater Fishing" category, suitable for targeting these smaller species.
- Less Line Visibility: As mentioned, lighter line (4-6 lb test) is less visible in the water, which can make a big difference for wary bluegill. A lighter rod handles this lighter line much better, reducing tangles and breakage.
- Enjoyment: Honestly, it's just more fun! The delicate touch required for bluegill on ultralight gear teaches you finesse and makes every catch, big or small, a rewarding experience. If you're looking for a good starting point, many "Best Beginner Fishing Kits for Kids" often include ultralight setups perfect for panfishing.
Using appropriate gear also helps you stay within reasonable limits. While bluegill are plentiful, knowing your "Panfish Daily Limit in Indiana: 25 per Species" for crappie, bluegill, and sunfish ensures sustainable fishing.
| Feature | Fixed Bobber | Slip Bobber |
|---|---|---|
| Depth Control | Limited to casting distance of leader length | Can fish any depth, limited only by line on spool |
| Casting Ease | Difficult to cast in deep water | Easy to cast, even in deep water |
| Setup Time | Quick and easy | Slightly more involved (bobber stop, bead) |
| Sensitivity | Good, often preferred for subtle bites in shallow water | Excellent, often less resistance for fish |
| Ideal Use Case | Shallow water (under 6 feet), beginner friendly | Deeper water (over 6 feet), varied depths, experienced anglers |
| Key Components | Bobber clips directly to line | Bobber stop, bead, line threads through bobber |
No matter which bobber rig you choose, remember that bluegill fishing is all about patience, observation, and enjoying the process. With a properly rigged bobber, you're well on your way to a fantastic day on the water!
Disclaimer
This article is for general informational purposes only and does not constitute professional advice. Laws, prices and regulations vary by location and change over time. Consult a qualified professional for guidance on your specific situation.